
Articles
The best app to reduce your iPhone screen time
Quick disclaimer:
I am not affiliated with the app recommended in this article. I just wholeheartedly believe in it.
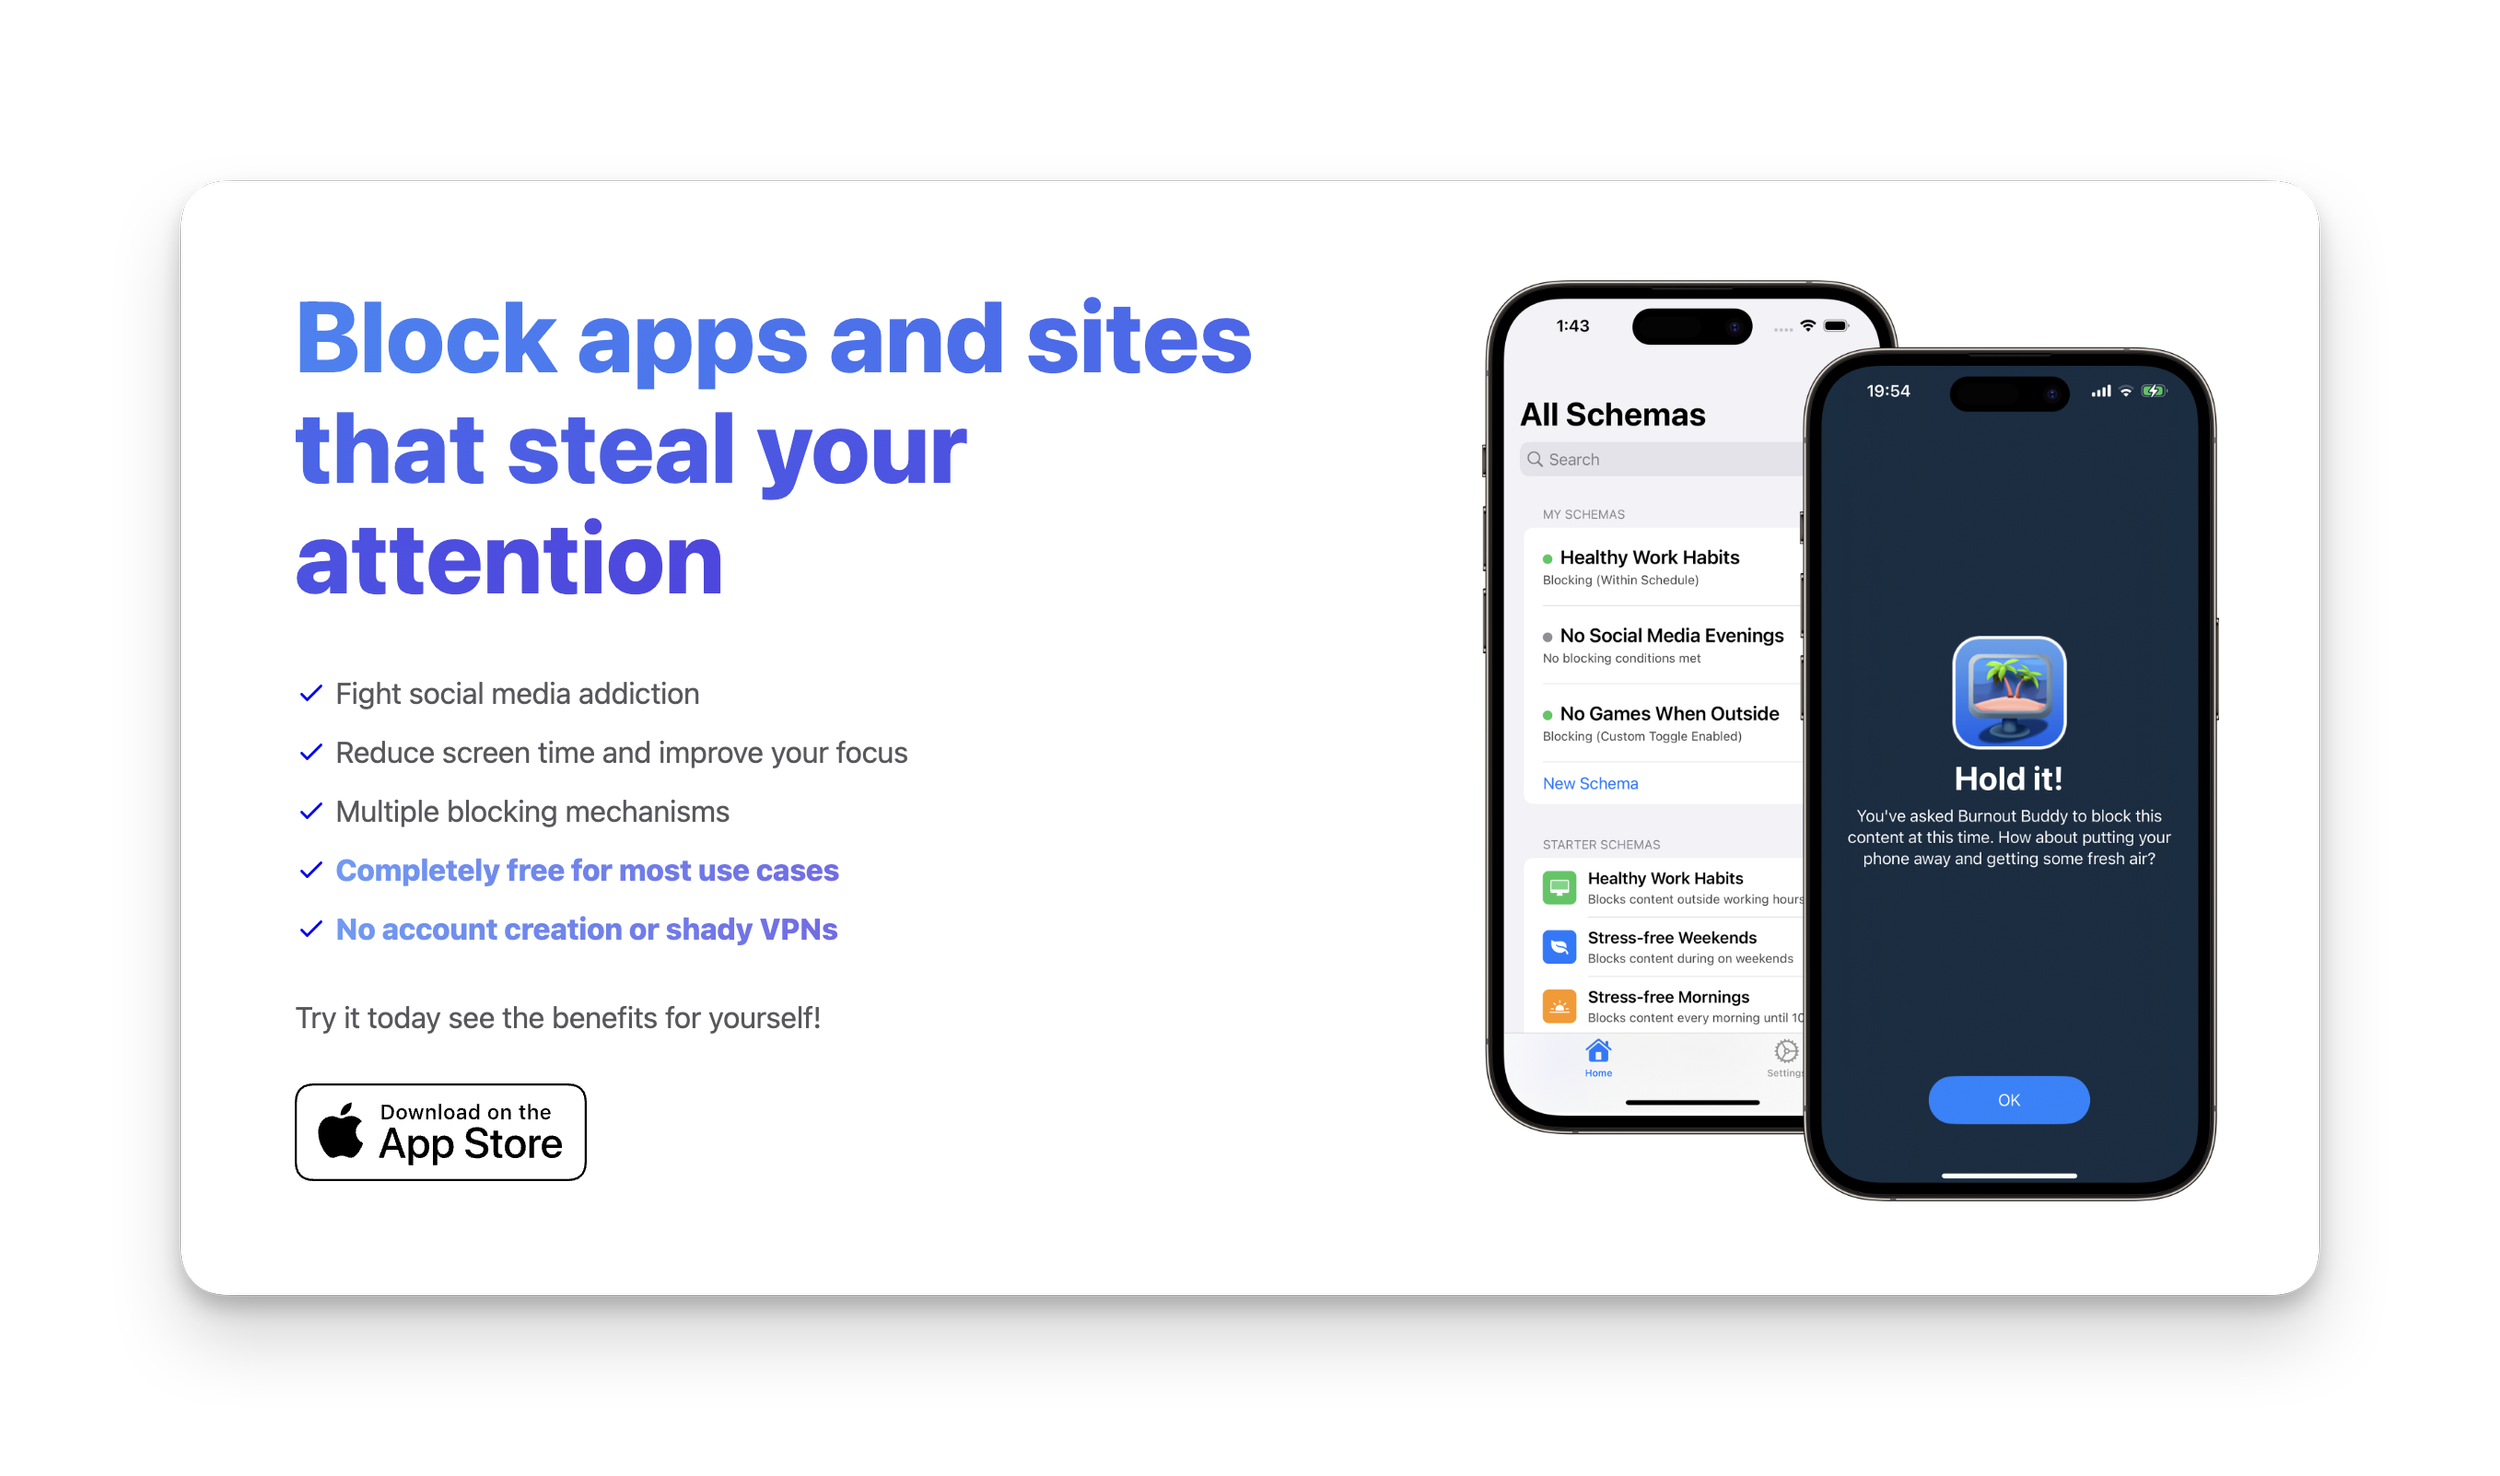
There’s a lot of app blocking apps on the market these days. (Probably because we’re all addicted to our phones — right?)
If you’re like me and have tried them all but still manage to override the blocking mechanism (😢), then I have the app for you.
Here’s a few reasons why I love this app:
It collects ZERO data about you
It’s free for MOST peoples needs
If you need more blocking options it’s only $9.99USD in the App Store — no subscriptions!
The blocking mechanism is so infuriating that you truly won’t want to bother unblocking it.
So, what’s the app?
The free version allows you to set up two “Schemas“. Here are the two I created and personally recommend:
1. Combined app access schedule and daily usage limit
The most effective combination I have found is to block all distracting apps in the morning and evening and also set a daily usage limit.
Here’s how to set up a schedule and daily usage limit:
Open Burnout Buddy
Click the + icon in the top right
Give your schema a name in ‘Step 1’ (eg. 30m limit)
Select all the apps and websites you want the schema to apply to in ‘Step 2’
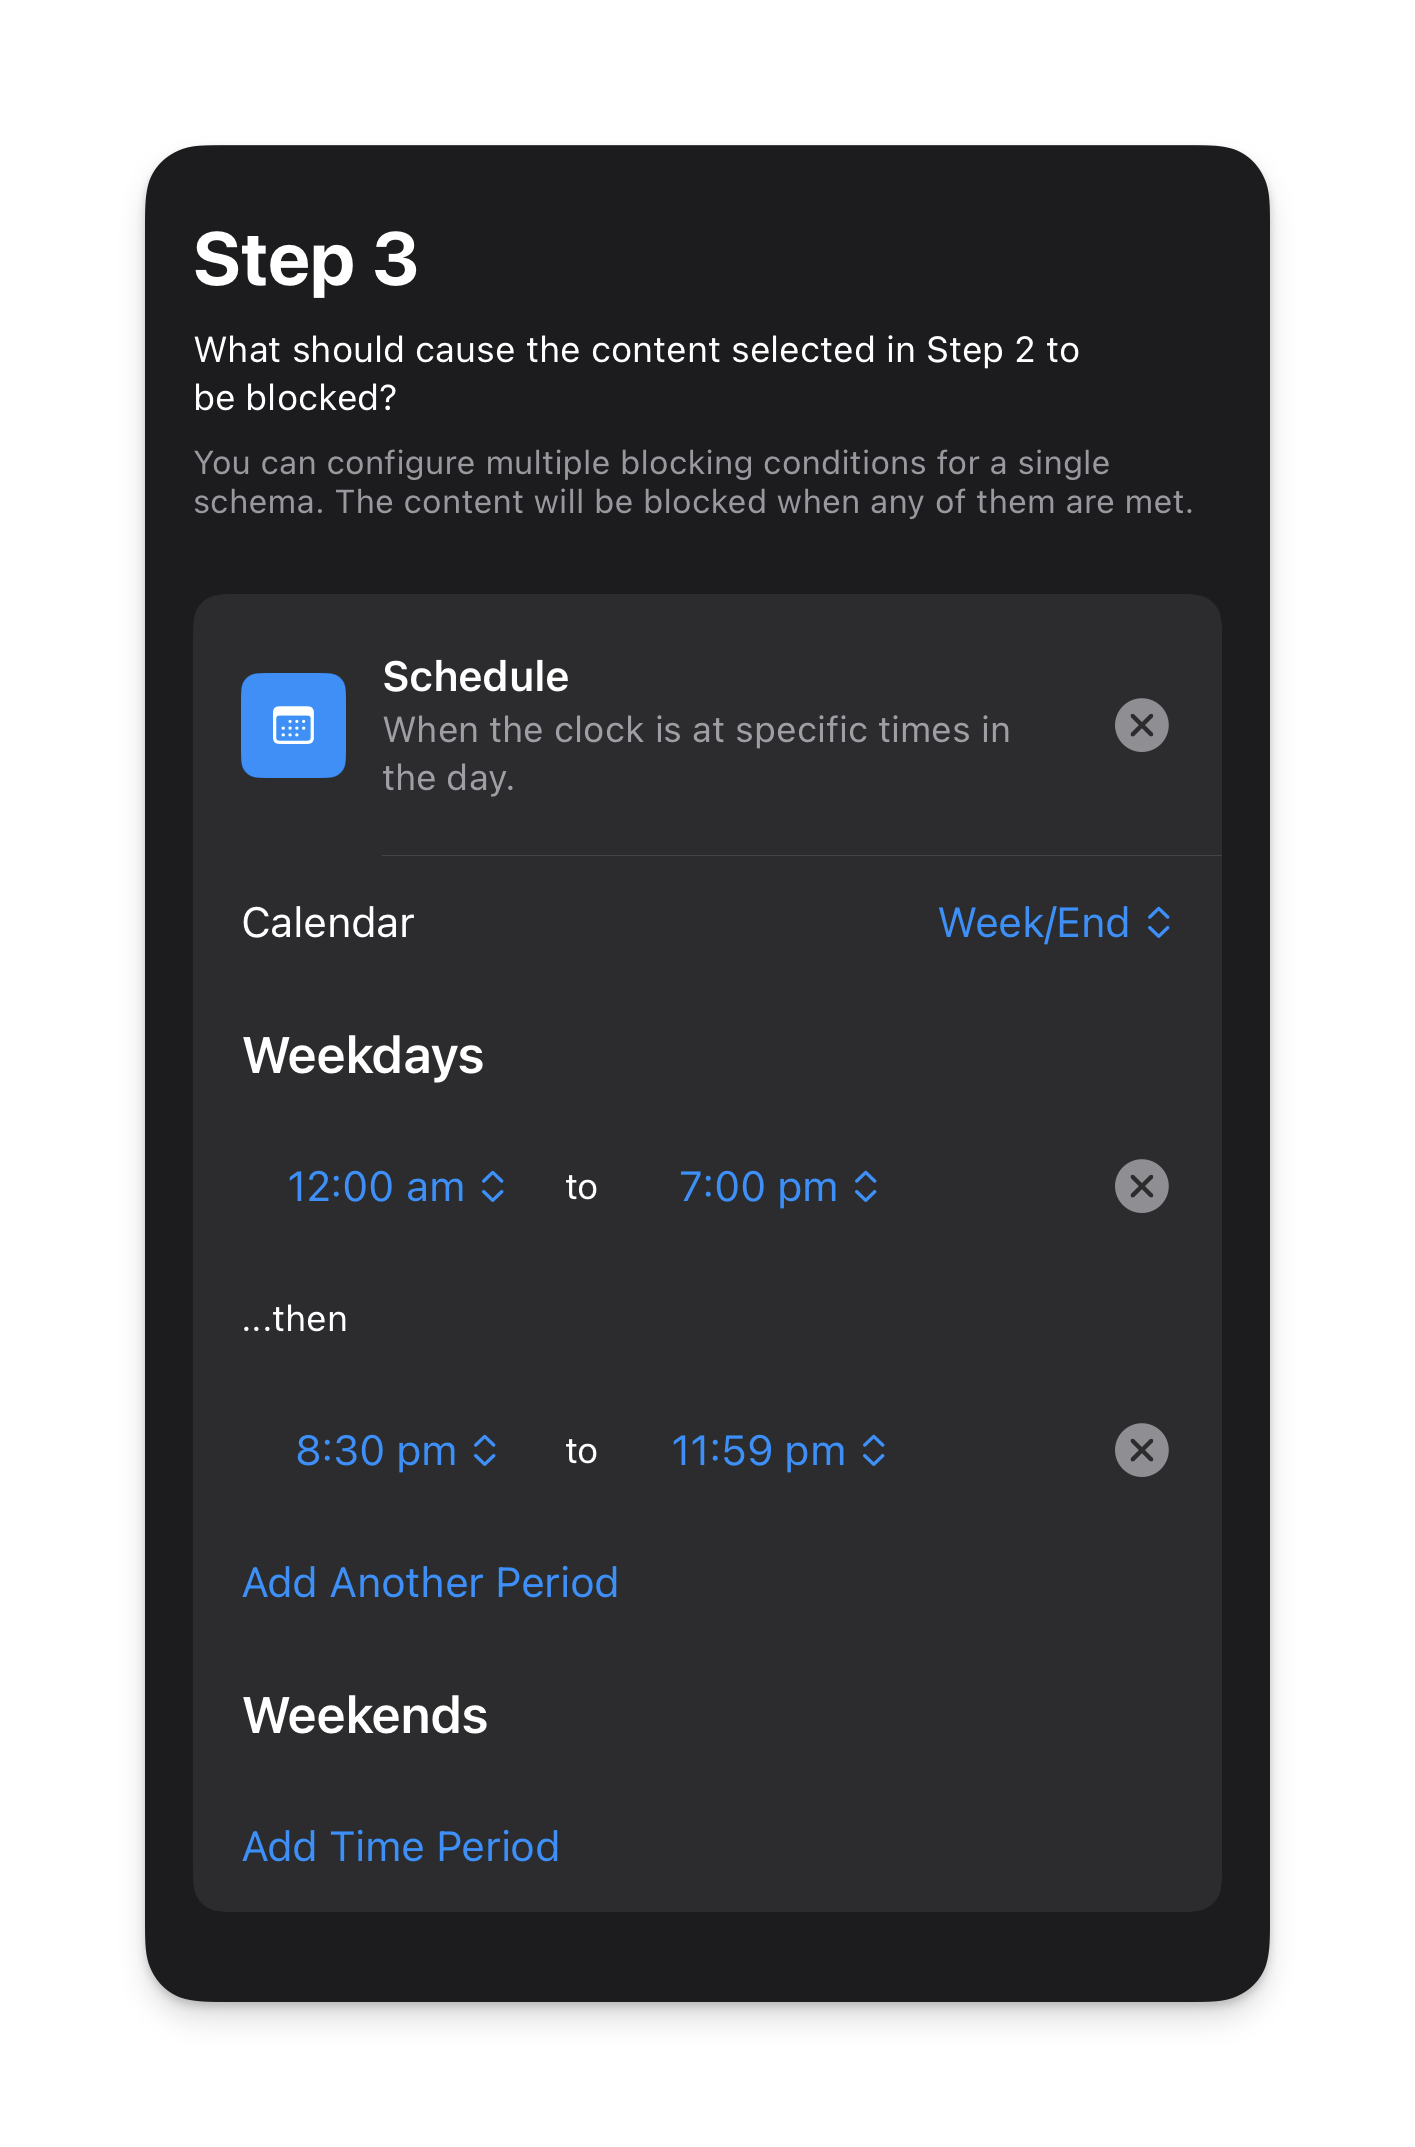
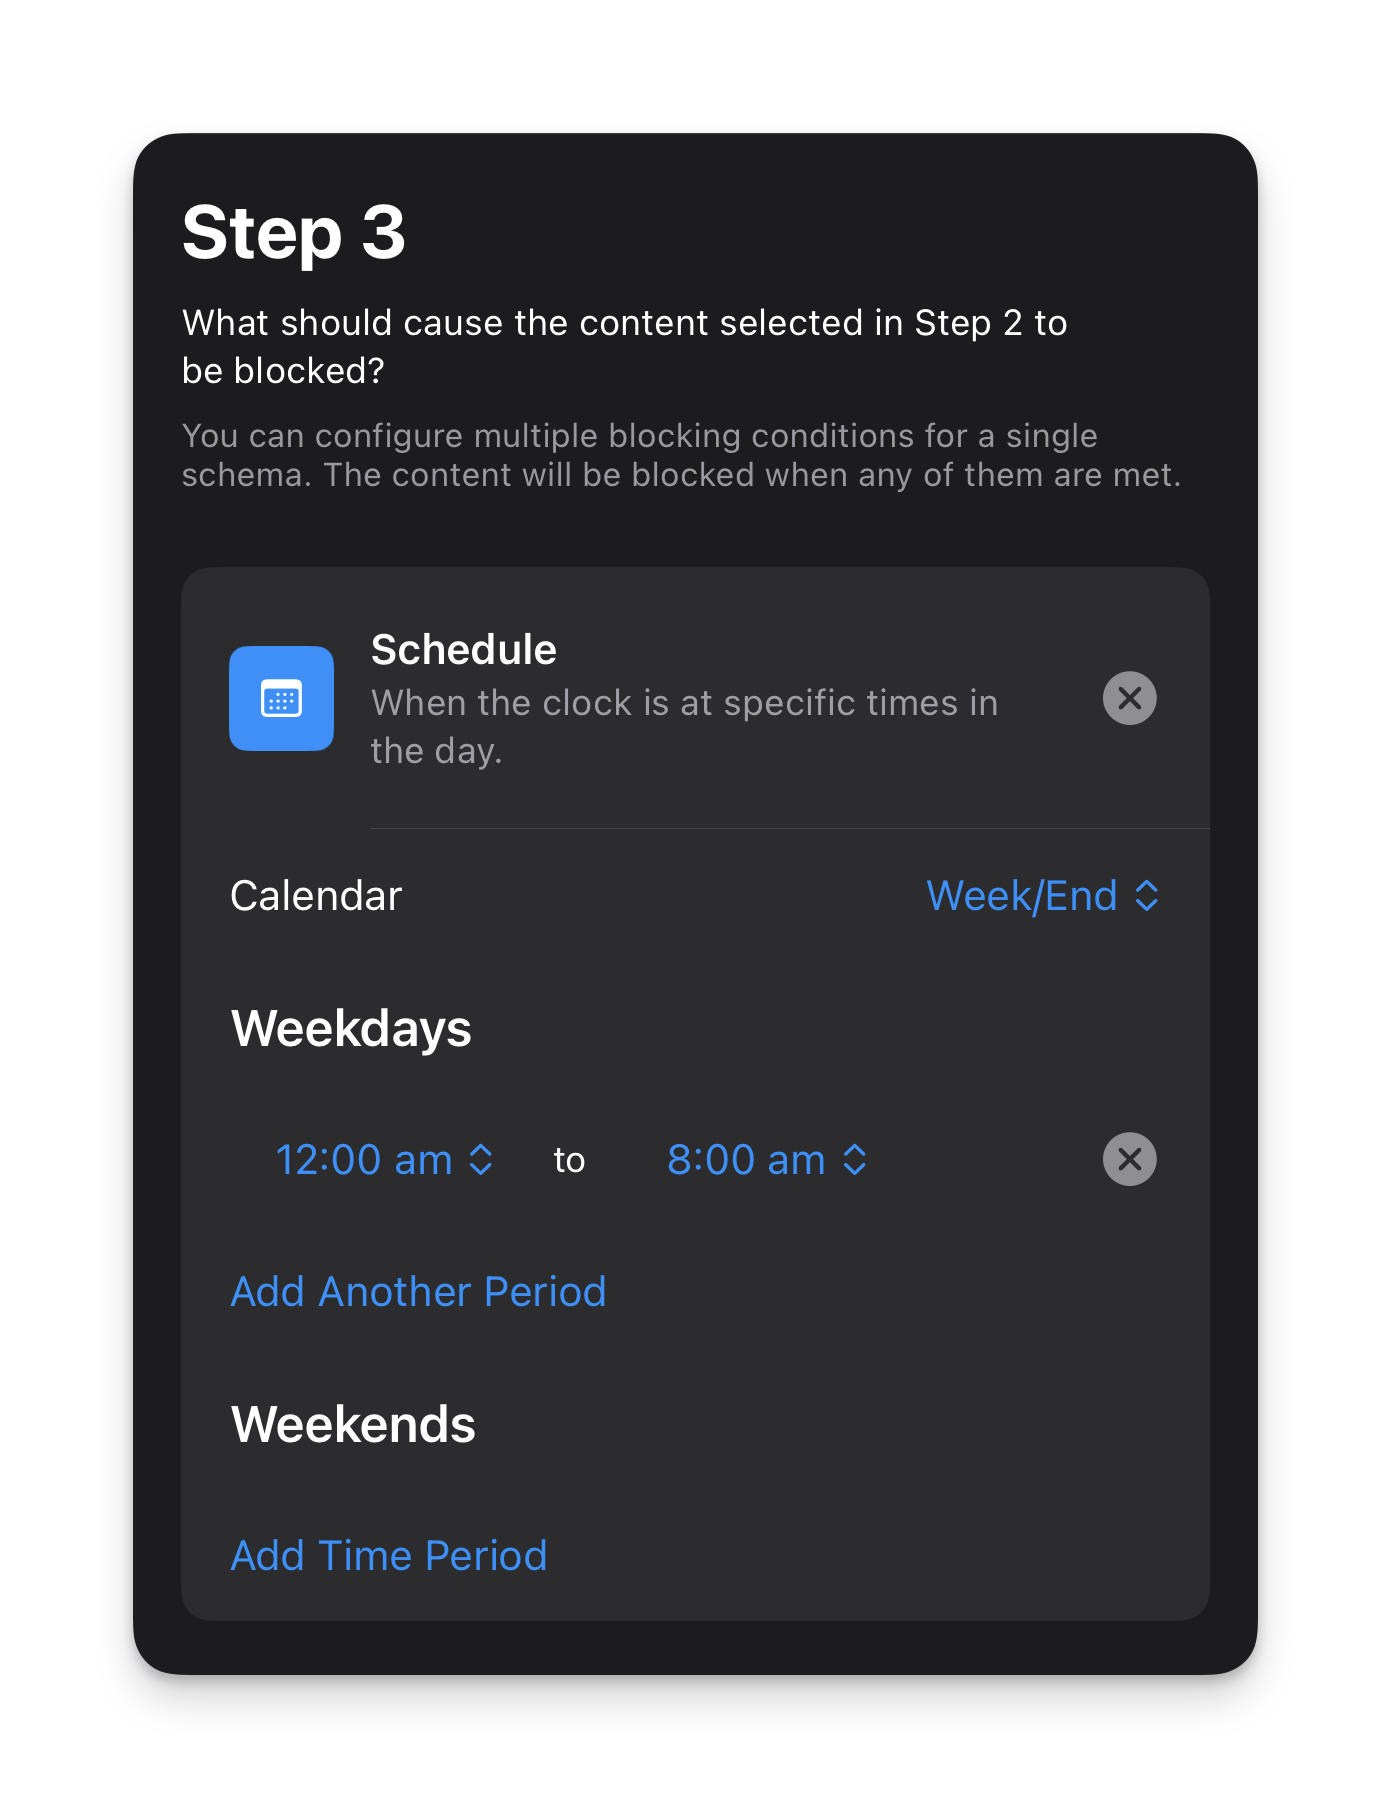
Choose the schedule you want the schema to run on.
I currently have mine set as follows:
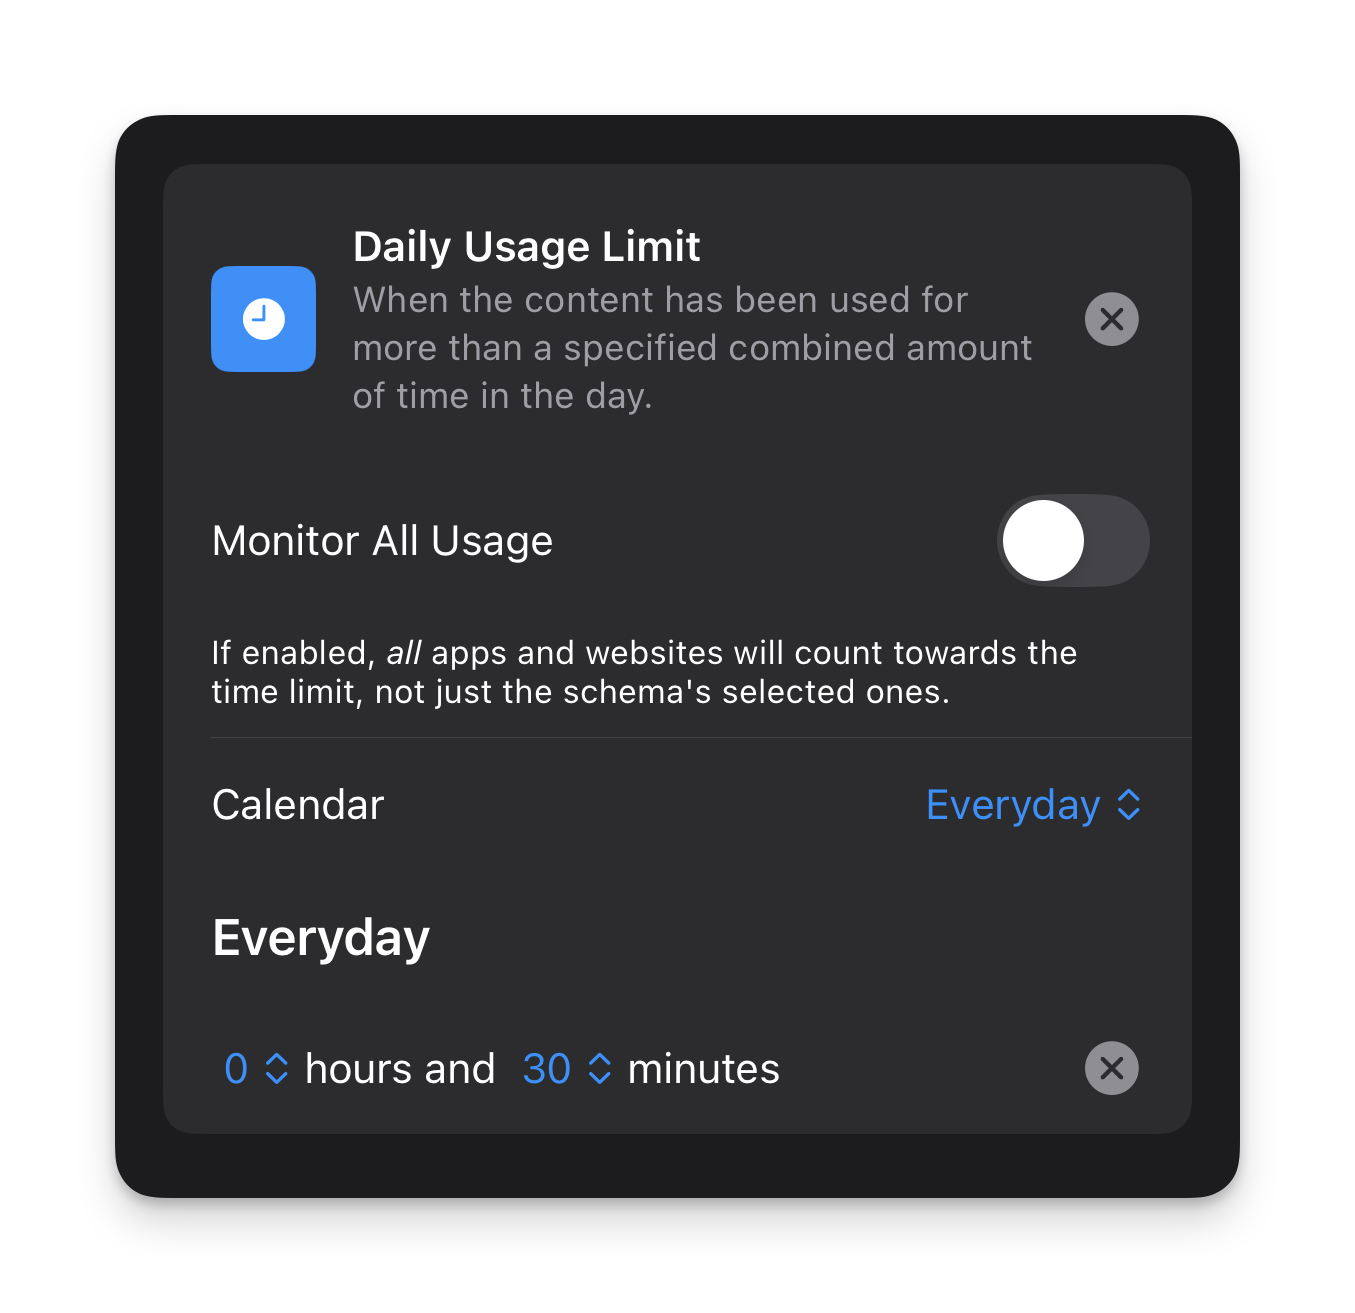
- Now set a daily usage limit.
Mine is set as follows:
- Set custom/siri settings if desired (I personally don’t use these settings)
- Enable ‘Strict Mode’ in the ‘Advanced’ section.
- Hit ‘Publish’ in the top right.
2. Quiet Mornings
I think a lot of us have become quite conditioned to fear being ‘unavailable’ in case there’s an emergency when 99.9% of the time there are no emergencies.
I am guilty of this.
But recently I thought to myself, if I was someone who didn’t get out of bed until 8 or 9 am, I wouldn’t be available until that time anyway — so if I’m awake but unavailable, what’s the difference?
This led me to setting up the following schema.
What was initially a 1-week experiment for me, turned into a permanent addition to my digital wellness toolkit for creating more intention and clarity in my days.
Here’s how to set up a quiet morning schema:
Open Burnout Buddy
Click the + icon in the top right
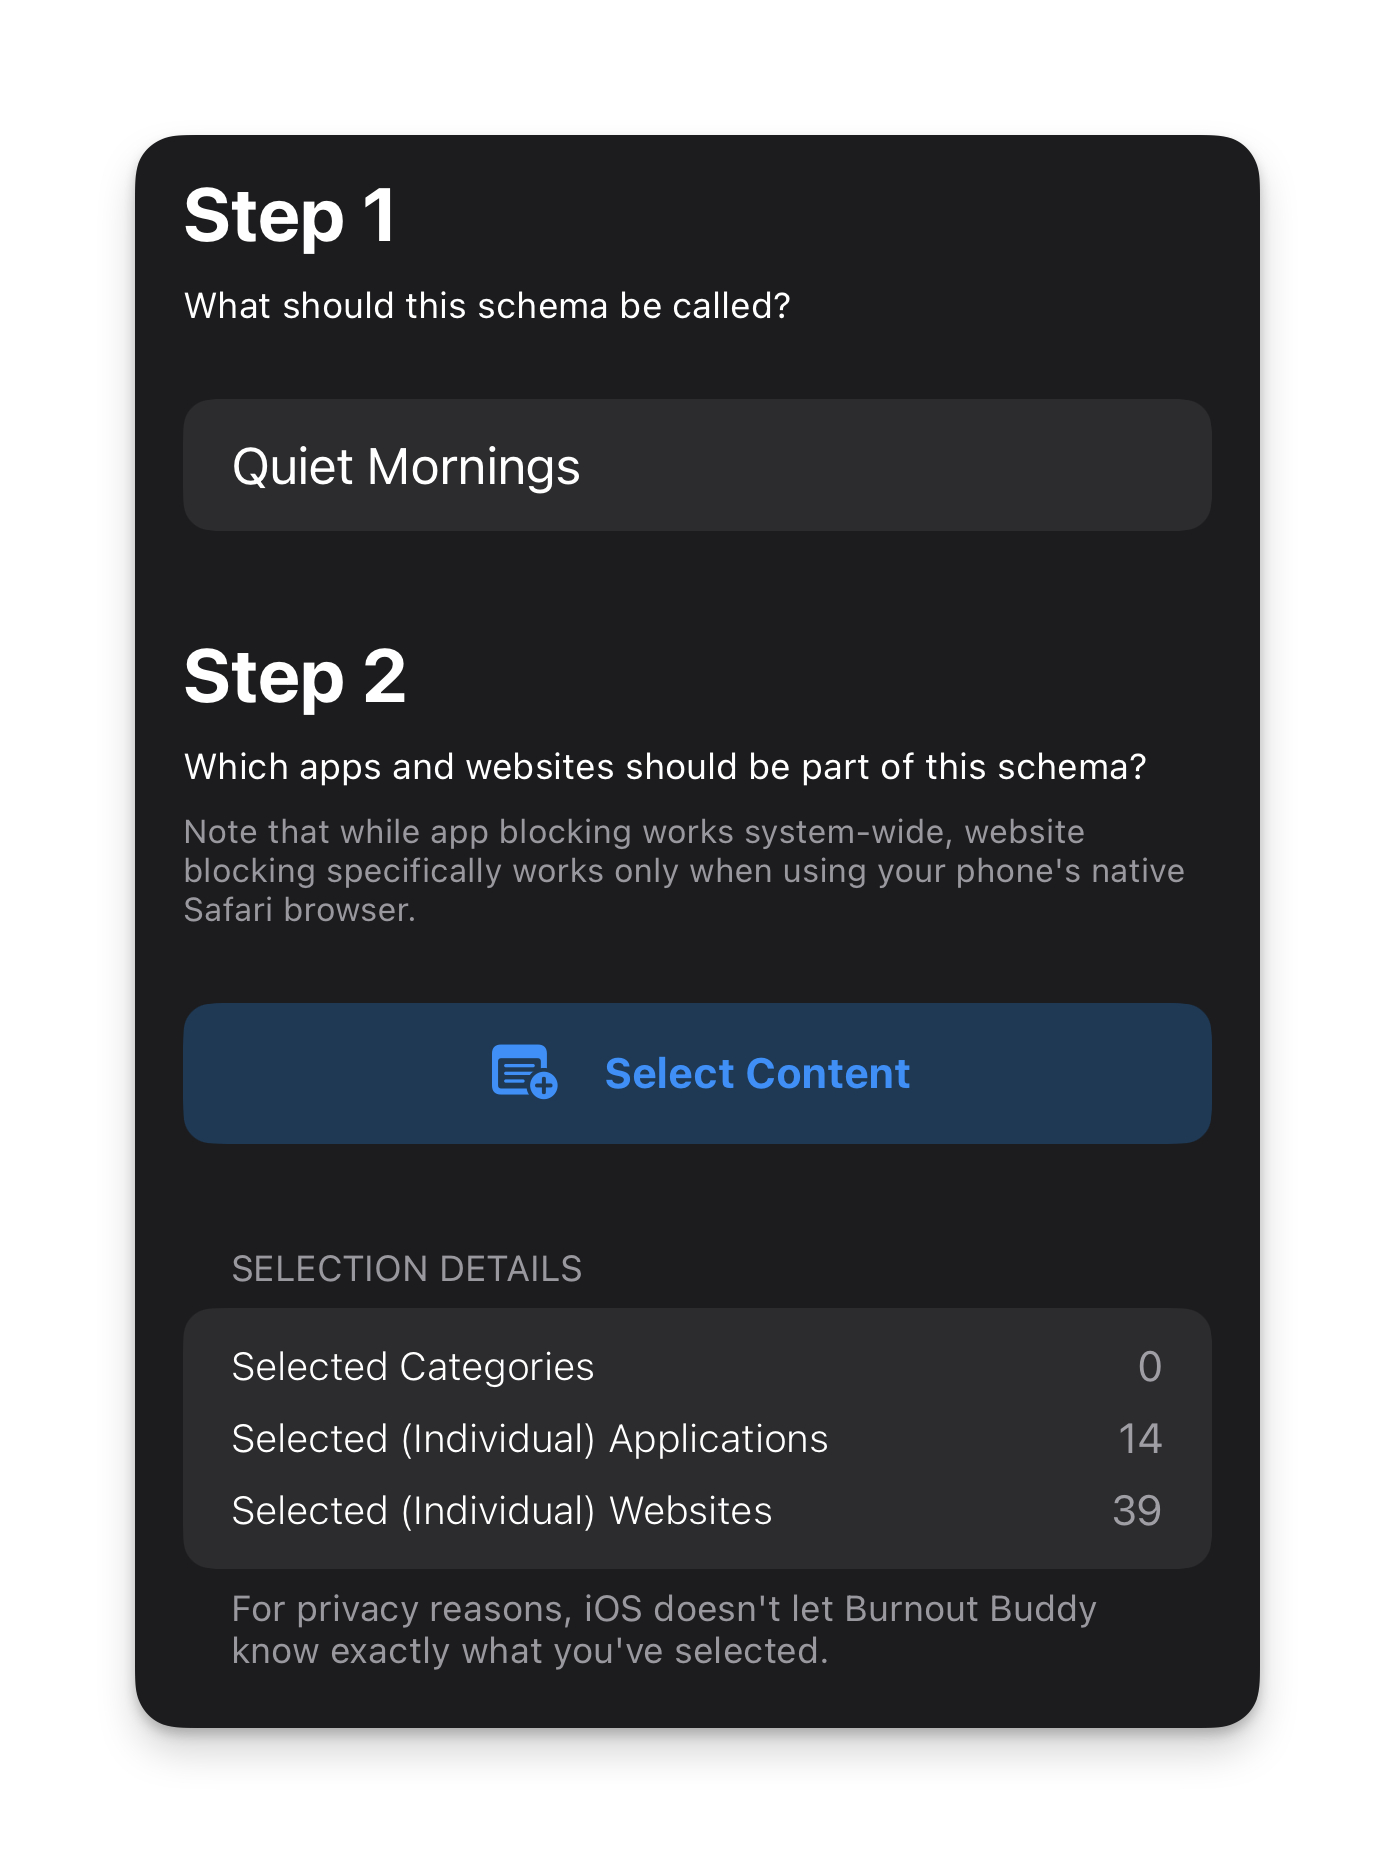
Give your schema a name in ‘Step 1’ (eg. ‘Quiet Mornings’)
Select all the apps and websites you want the schema to apply to in ‘Step 2’
You can see in my example below that I have 14 apps and 39 websites blocked. I’ve included ALL messaging apps as well as all news pages, social media apps and websites and anything that isn’t essential or completely un-distracting (ie. the Phone app so I can make and receive calls and essential tools like banking apps).
- Choose the schedule you want the schema to run on.
I have mine set as follows:
- For this schema I don’t have a daily usage limit as this is purely for blocking apps and websites in the morning.
- I also don’t have any custom/siri settings for this schema either but you can add them if you want.
- Enable ‘Strict Mode’ in the ‘Advanced’ section.
- Hit ‘Publish’ in the top right.
This schema makes my iPhone feel like a dumb phone without me actually having to turn it into a dumb phone. I wake up and look at the time and have zero reason to do anything else on my phone because there is truly nothing of interest to do on it.
This means when I wake up, my attention is on me and my life for the first hour or so of my day.
The impact of this simple act is only truly understood when you experience it for yourself.
Here’s a couple of tips to make this something you can add to your daily life without creating unnecessary anxiety for yourself:
Let close friends and family (or anyone you’re in regular communication with) know that you’re doing it and that they can call you in an emergency
Try to give yourself at least 1 hour in the morning after your usual wake up time
Leave enough time before your daily commitments start (for example, if you start work at 9am, you might not want to have everything blocked until 9am in case you need to check up on emails before the day begins)
The benefit of giving yourself a dedicated window every day where the external world can’t get to you and distract you is that you have the time and space to start your day with clarity and intention. You can journal, meditate, read, get to know yourself better or plan your day before the world tells you what you should do with it.
This is one to really try out for yourself. And if you do, let me know how you find it in the comments below!
One simple way to organise your entire digital life
You've probably heard of PARA before. You might even be one of the many people who use it. Today I’m going to talk about why I don't think it works — and what I do instead.
This is for anyone who has a desktop full of random files, can never find the document they’re looking for or has tried other organisational systems without success. If you implement what I am about to teach you, your life will never be the same again (genuinely).
The PARA Method and why it doesn’t work
PARA is an organisational structure created by Tiago Forte for managing your digital life. It’s broken down as follows:
P — Projects
A — Areas
R — Resources
A — Archive
According to Tiago, projects are short-term efforts in your work or life that you're working on now, areas are long-term responsibilities you want to manage over time, resources are topics or interests that may be useful in the future and archives are inactive items from the other three categories.
In the PARA method it can be hard to know whether something should go into a project or an area.
Now, I don’t know about you, but naturally I think of everything in my life in terms of areas — work, personal, money etc. These are all dedicated, defined and distinct areas of my life.
So, in my system, projects don’t come before areas — projects are inside areas.
I also don’t think a folder for ‘resources’ makes sense either. In the PARA method, resources can easily become a dumping ground for anything and everything causing it to quickly become a confusing mess — the exact thing we’re trying to eliminate.
My system is built on 5 principles:
Principle 1: Everything starts with an area
As I just touched on, the top level in my system is Areas. I have 6 areas:
Work — career, businesses, side hustles etc.
Leisure — personal interests, hobbies, travel, entertainment etc.
Money — income, expenses, taxes, savings, loans etc.
Life — personal documents, home, transport, mind, body, digital life etc.
People — relationships, friends, family etc.
Media — photos, movies, music, books etc.
Principle 2: Archives live inside areas
In the PARA method, archives exist on their own, just like projects. Whilst I can understand the logic of wanting to keep all archived things out of the way, it actually becomes unhelpful when everything is dumped together. You lose the context of where things came from and what area they belong to.
In my system, archives sit in each area like so:
Work
├── Archive
└── [sub folder]

Leisure
├── Archive
└── [sub folder]

etc.
Principle 3: Projects live inside areas
If you’re working on a project, that project belongs to an area, so why not have it exist in the area?
One thing to note is that not every area will have projects. In my experience, it’s just the areas of work, leisure (for example, your latest DIY project) that have projects.
Work
├── Archive
├── [Project]
└── [sub folder]

Leisure
├── Archive
├── [Project]
└── [sub folder]

etc.
Principle 4: Numbers create priority order
Without adding numbers into your system, you’re forced to view your areas alphabetically or by recently modified which doesn’t provide any order to your system. That’s why I recommend ordering your areas by priority.
Default alphabetical order:

Leisure
Life
Media
Money
People
Work
Number priority order:

1 — Work
2 — Leisure
3 — Money
4 — Life
5 — People
6 — Media
Note: Your priority order may look different to mine.
Principle 5: Colours create instant recognition
Colour coding isn't just for highlighters. When all your folders are the same default blue, your brain has to read every label to find what it's looking for. When each area has its own colour, you navigate by recognition rather than reading — the same way you'd spot a red book on a shelf without reading every title.
I colour code each of my six areas so that at a glance, without reading a single word, I know exactly where I am and what I'm looking at.
The real-life system I’ve been using for over 6 years
Here is what my folder system looks like (feel free to use it as a starting point for your own system):
1 — Work
├── Archive
├── For the Do-Gooders <- project
├── More Mindful Life  <- project
├── Better than reels  <- project
├── Clients
├── Portfolio
└── Work admin

2 – Leisure
├── Archive
├── Personal projects  <- projects
├── Personal interests
├── Travel
└── Events and entertainment

3 – Money
├── Archive
├── Income
├── Savings
├── Expenses
└── Tax

4 – Life
├── Archive
├── Personal Documents
├── Mind
├── Body
├── Home and transport
└── Digital life

5 – People
├── Archive
├── [My partner]
├── [My brother]
├── [My parents]
└── Friends

6 – Media
├── Archive
├── Photos and videos
├── Movies
├── Music
├── Docs
└── Books
Why this system works so well
When you create order, things become simpler. You can find things quicker. You eliminate what I call ‘micro-frustrations’.
Everything has a place and everything is in its place. And, if something doesn’t have a place yet (such as a new family member), it’s easy to know where it belongs (People → Family) because you’ve simplified your digital life into easy to understand areas of your life.
Where to use this system
The main place we’ve discussed today is your folder system on your computer. But I’ve also been using this system in my calendar since I first created it. This is extremely helpful to see at a glance what time I’m giving to the different areas of my life.
Recently a friend of mine colour coded their calendar for the first time ever and expressed how much benefit they had gained from it. I remember being surprised and realising that this is actually something not everyone does!
How to implement this for yourself
So, if you haven’t already gone ahead and copied my folder structure, here’s how you can set it up for yourself:
Decide on the areas of your life
Add an archive folder into each area
Add your sub-folders and projects into each area
Assign each area a colour (for mac users you can right click on a folder and assign a coloured tag. For PC users, ask Google!)
Assign each area a number
Start organising all your documents into their relevant folders
If this feels like an overwhelming task, don’t worry. You don’t have to do all of this at once. Start with the main areas and start to move things across gradually. If you’re not sure about what sub-folders to include, start organising your folders into their areas and your sub-folders will emerge naturally.
It’s also important to note this isn’t a fixed structure. I used to have an area for study when I studied — now it’s archived. Just as life changes, your folders will also change.
Taking it further
In a future post I will talk about how I implement this structure in my favourite note-taking app (Obsidian) and how you can too. My note-taking system features two extra folders so keep an eye out for that if you’re someone that works with knowledge or wants to set up your own ‘second brain’.
The bigger picture
Whilst this entire post has been focused around digital organisation, there’s actually a deeper reason for why it’s worth doing this:
You're creating mental clarity and freeing up mental bandwidth. That bandwidth can go towards more important things — getting to know yourself more deeply, understanding what you want out of life, and actually living it. Less time managing digital chaos means more time enjoying your life.
How to actualise your vision with more ease
If you’re anything like me, your mind is always buzzing with new ideas, exciting possibilities, and ambitious projects. But sometimes, this creativity and curiosity can leave you with a trail of half-finished projects and unexplored ideas. That’s where my waterfall system comes in — it’s a simple yet powerful framework I developed to help bring clarity, focus, and intentionality to your life.
In this post, I’ll walk you through the five pillars of the system and show you how to align them with your goals, so you can live a more mindful life.
The waterfall system is made up of the following:
1 vision
2 keystone habits
3 projects
4 gatekeepers
5 sources of information
Why a waterfall? Well, each step flows into the step above it. So, I suppose it’s more of a reverse waterfall really… Anyway let's break it down. It all starts with:
1 Vision
You may already know what your vision is, so go ahead and write it down. If not, ask yourself the following questions:
What are the things that bring me joy and fulfilment when I'm doing them?
What are the things that I value most about my current life, and what would I want to preserve or replicate in my future?
What would I regret not doing if I were 90 years old looking back on my life?
Next we move into:
2 Keystone Habits
Keystone habits are the daily actions that are simple in nature but lead to a cascade of positive effects. For example, making your bed in the morning or not buying junk food.
Here you want to ask yourself:
What are the daily habits that will help me make progress towards my vision?
You may find there are more than 2 habits that support your success but the goal here is to keep it simple so that it's achievable. To narrow it down to just 2 habits think of it in a different way:
“If I didn't do these 2 habits, I would find it much harder to make progress towards my vision.”
My two keystone habits are:
Creating a daily plan
Going on a daily walk
Without a daily plan my day can very easily get pulled in a million different directions and without a daily walk I can easily end up mentally fatigued and overwhelmed.
Next up is:
3 Projects
There's a very good reason for having just 3 projects. Any more and you are decreasing your focus.
A project can be a big undertaking, often spanning weeks or months and involving lists and lists of tasks to complete. Having more than 3 projects at any one time can very quickly become overwhelming.
This section is a little more personal to your own specific life but as an example you might have:
A health goal
A creative project
A personal development pursuit
Which leads me nicely onto:
4 Gatekeepers
I've aptly called these gatekeepers because these 4 steps literally act as the barrier between your vision and the million and one distractions we face.
They are the filter of your ideas and the defenders of your vision.
My four gatekeepers are:
Vision
Cost
Time
Resources
Yours may differ slightly to mine and I suggest sitting down to deeply consider yours.
When I have a new idea for something I want to do or pursue, I'll run it through the four steps by answering a series of questions:
Vision
Is this in alignment with my vision?
Yes → Continue to step 2
No → Don't do it
Cost
Does this require financial investment and is that realistic right now?
Yes → Continue to step 3
No → Add to green room (I'll explain this in a moment)
Time
How long will this take and do I have the time for this?
Yes → Continue to step 4
No → Do I need to make time for this?
Yes → Continue to step 4
No → Add to green room
Resources
Do I have the tools and knowledge to execute this right now?
Yes → Plan it out
No → Is it realistic to acquire the resources right now?
Yes → Plan it out
No → Add to green room
Now to quickly explain what I mean by ‘green room’…
A green room is the room or area used by people when they are waiting to go on stage. So for me, my green room is the waiting area for my ideas before they're ready to take space in a project slot.
Finally we have our:
5 Sources of Information
According to a study, Americans consume around 34GB of media every day! And this was in 2008 before TikTok, Instagram Reels and YouTube Shorts even came onto the scene!
It's no wonder we're suffering from information overload. That is a lot of information to process.
My attempt at combatting this information overload is to minimise the sources of information I am absorbing.
So, what counts as a ‘source of information’?
Well that can be anything from books to podcasts and newsletters to AI.
The primary idea here is that it's slow media or long media. ie. anything that doesn't have trending audio or multiple fast cuts!
My current sources of information include:
Myself
AI
1 book
1 newsletter
1 course
You can include whatever you want in your 5. You might have a favourite podcast or newsletter that can take up a slot. Or, like me, you might love going to AI to talk through your latest ideas and answer your most burning questions.
The policy here is one in one out. So when I finish one of my books or courses, I have a slot open for a new source. Or if I have a new source that I organically come across, then I will decide if I need to swap out an existing source.
A quick side note:
If a project you’re working on involves research of any kind then that is permitted outside of these 5 sources of information. These 5 sources are primarily for passive information (ie. information that is being sent to you rather than that you are seeking out).
If you are doing research, be mindful to not get lost opening tab after tab of ‘interesting’ articles and stick to what you wanted to research.
I have been extremely intentional here by eliminating ‘passive’ sources of information from my life (ie. newsletters, Instagram and YouTube recommendations) and I highly recommend you try the same. Even if it's just for a week, give it a go to see what happens.
How it all works together
Now that we've reached the bottom of the triangle, let's think of it in the reverse to really solidify it's magic in our minds:
We have many sources of information coming at us every day of the week so we intentionally choose just 5 sources to minimise this bombardment of information.
From our 5 sources of information we inevitably generate new ideas of things we want to do or try in our lives. So for any new idea we have we run it through past our 4 gatekeepers. Only if it is approved by all 4 gatekeepers does it make it to one of our 3 project slots.
For us to successfully make progress with our projects we need 2 keystone habits that we implement daily.
Finally, when we achieve all the steps prior, we can actualise our vision with more ease, simplicity and grace.
My 30-min journalling routine that connects my future vision to my daily actions
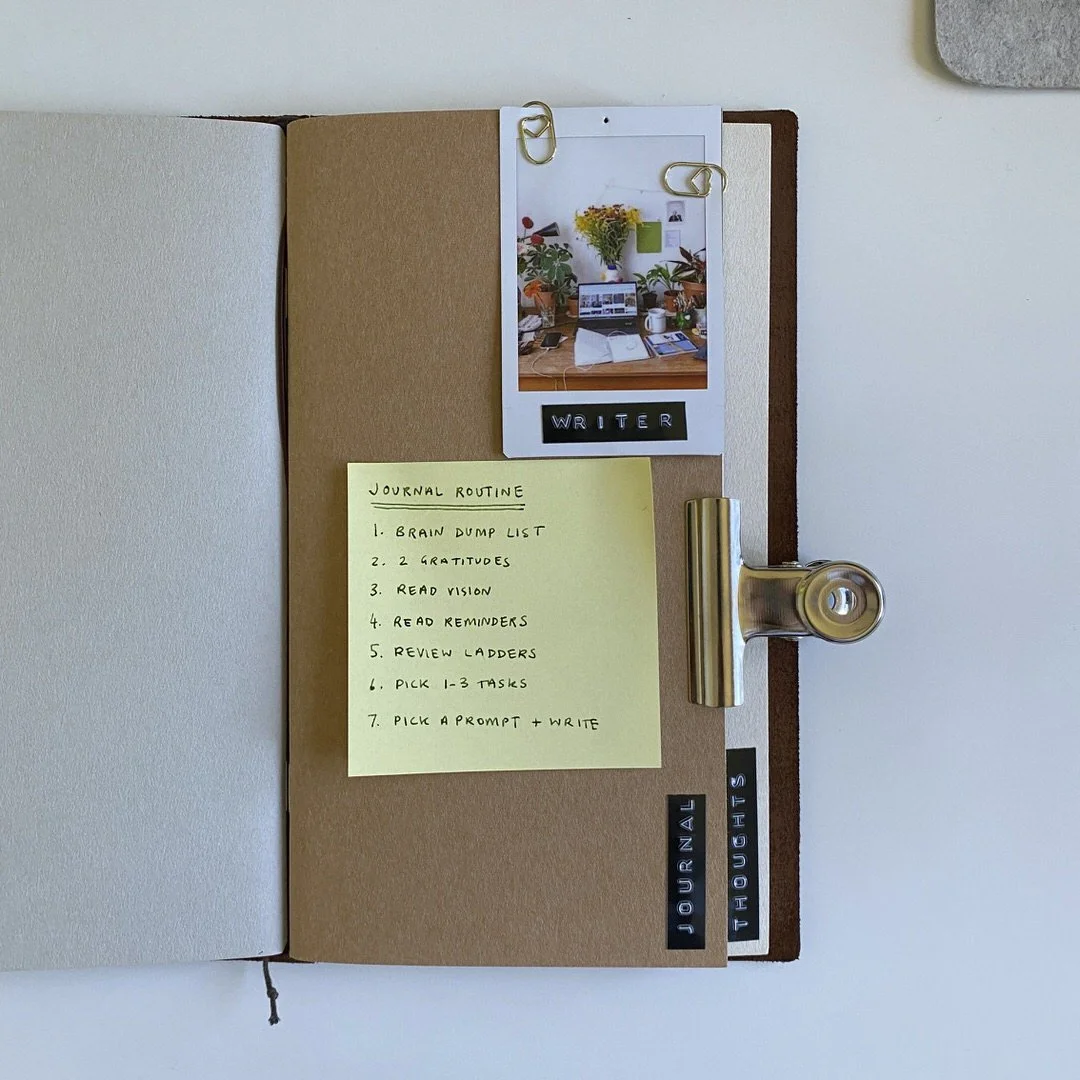
A peek into my favourite notebook (my brown regular Traveler’s Notebook)
I’ve always struggled to connect my future visions with my present day actions. My ADHD brain loves to live in the now, but the driven and ambitious part of myself always has her eyes set on the future.
It’s an uncomfortable tension at times but this new journalling routine (and a little bit of flexibility) has truly helped me connect the two.
The routine is a blend of two different journalling practices from Zach Highley [1] and David Fragomeni [2] — with some of my own customisations.
The best part about this is it can all be done in less than 30 mins.
Why this works
As a high level overview the routine is as follows:
Do a brain dump
Write 2 gratitudes
Read your vision
Read your reminders
Review your ladders
Pick 1-3 tasks for the day
Journal
The reason this particular order works really well is because you’re first clearing your mind with a brain dump, then creating a feeling of openness and acceptance before connecting to your vision for the future. You then read your list of reminders to give yourself a little personal pep-talk and remind yourself why you in fact *can* achieve your vision (those voices of self doubt can be saved for step 7).
Once you’re feeling motivated and inspired to go after your dreams, you can then shift into planning mode. Reviewing the direction you’re going in and picking 1-3 tasks for the day brings your future vision and your daily actions into alignment.
Finally, as a way of getting to know yourself on a deeper level and clearing anything that might be holding you back, you can pick a prompt and journal.
Sound good? I thought so.
Here it is:
Step 1: Do a brain dump
If ever I’m overwhelmed with to-do’s, I will _always_ turn to a brain dump. The usual reason for feeling overwhelmed is that I have too many things buzzing around my head and I’m worried I’m either going to forget something or not be able to do it all.
Doing a brain dump allows me to quickly capture everything that’s on my mind. It’s like a deep exhale for the mind. The instantaneous relief I feel after getting all my thoughts out in front of me is why I will always encourage people to utilise it’s simple power.
As a quick side note: brain dumps work wonders for busy minds trying to sleep. Keep a notepad and pen next to your bed (or make sure your phone is set up for sleeping) to quickly jot down any thoughts and I can guarantee you’ll sleep better.
As part of this journalling routine, my brain dumps usually look like a few things I have on my mind or want to get done. They don’t have to be 20 items long to help.
Step 2: Write 2 gratitudes
This particular step is part of Zach’s routine where he follows a 1-2-3 process (1 brain dump, 2 gratitudes and 3 small goals). So, two gratitudes is simply because it’s step 2 in his process.
I personally decided to stick with two (even though 3 is my favourite number) because one felt too little and two is 100% more than one. Also, it’s generally pretty easy to think of one thing to be grateful for. Two makes you think a little harder!
Step 3: Read your vision
This step is from David’s routine and I knew instantly that I wanted to start doing it myself because I’ve been considering a practice like this for a while and hadn’t quite figured out the right format for it. When I heard David explain it, I knew the simplicity was exactly what I was looking for.
I have my vision written in the same notebook that I journal in so that I can quickly and easily turn to the page and read it as part of my routine.
Now, of course, to be able to read your vision, you first have to write your vision so I recommend taking some time to write out exactly what your vision is.
For mine, I wrote “5 years from now…” and then wrote out my vision making a point to include things that created feelings and strong visuals in my mind.
For example, “I have a creative sanctuary that I get to work from every day. It is filled with natural light — morning and afternoon — with plants, books and wooden furnishings. It feels warm, intentional and inviting. I hear the birds outside.”
I’ve personally always struggled with the idea of 5-year, 10-year, even 3-year visions. Given how rapidly the world changes these days it feels strange to plan ahead that far because honestly who knows what things are going to look like.
So, whilst I wrote “5 years from now…” this figure is completely arbitrary to me and what I’m really saying is “How I would like my life to look in the future is…”.
The point is, this isn’t prescriptive and you should do it however feels natural to you.
Step 4: Read your reminders
Again, this step is from David’s routine, and just like David I am not a fan of the term ‘affirmations’. In my experience, they always feel more like wishing than believing and I find that when you can truly believe, you can truly make change.
If affirmations work for you, then you can consider this section to be affirmations instead.
My list of reminders serve as a mix of intentions, values, principles and practices that I want to remind myself of.
For example:
I trust my creative instincts and give ideas room to develop
Intentional steps forward matter more than speed
Everything I publish is a practice and helps me to grow and refine my thinking
Where I am now is exactly where I need to be to get where I’m going
To create your own list of reminders, spend some time reflecting on what really matters to you in terms of how you want to embody your:
intentions
values
principles
practices
If you can’t think of many to begin with, don’t stress. Now that you’ve said to your mind that this is something of importance, you’ll find it starts springing up suggestions at all kinds of random times (mostly in the shower). Write them down as they come to you.
Step 5: Review your ladders
You can replace this step with whatever works best for you in terms of planning your goals but if you’re anything like me, you need specific steps to get from A → B.
What I call my ‘ladders’ are essentially a list of small steps that get me from where I am now, to where I want to be (bringing my future vision and my daily actions into alignment). Each step I consider to be a rung on the ladder and the top of the ladder is, you guessed it, the goal.
Sometimes it’s hard to know the steps required to achieve your goal so there’s a couple of ways to approach this:
Work backwards from your goal asking ‘what do I need to do to get to this step?’. Eventually you’ll have steps all the way to where you are now.
Get AI to help. Now, whilst I don’t encourage AI for creative work (I truly believe creativity should come from human effort), I do encourage it for administrative or technical work. Simply tell your [[favourite AI]] what your goal is and that you need clear steps to get there, broken down in bitesize chunks. It probably won’t be perfect first time around, so do a little back and forth to get the list exactly as feels right to you. Trust your intuition here.
Reviewing your ladders is all about reminding yourself of the journey you’re taking so that when distractions come up (inevitably) throughout your day, you know what your priorities are and can make decisions accordingly.
As you take steps on your ladder, you may find yourself updating your ladders as you learn new information or your plans change. This is why we approach our ladders with a flexible mindset.
Step 6: Pick 1-3 tasks for the day
Cal Newport says in his book Slow Productivity:
“Strive to reduce your obligations to the point where you can easily imagine accomplishing them with time to spare. Leverage this reduced load to more fully embrace and advance the small number of projects that matter most.”
The reason for only picking 1-3 tasks for the day is because that feels manageable.
Marcus Aurelius, in Meditations, says “When you wake up in the morning, tell yourself: the people I deal with today will be meddling, ungrateful, arrogant, dishonest, jealous and surly.”
Now, that might sound a little pessimistic, but I take this as a reminder that we are going to come into contact with other people and distractions throughout our day that will ask of our time and attention — some of which we may need to provide.
Having 1-3 tasks allows us spaciousness for the inevitability of other people’s plans coming into contact with our own without it causing us to feel like we’re behind on our own plans.
If you get through your 1-3 tasks, well, you’ve probably got a long list of other tasks so you can pick another one and keep going. Or, alternatively, give yourself a pat on the back and enjoy some rest.
Step 7: Journal
If you’re someone who already journals, you may have your own journalling practice in which case feel free to use that here. Otherwise, if you’re looking for some inspiration you can try these two methods:
1. Free-write
This is also known as ‘stream of consciousness’ writing where you literally write anything and everything in your mind. “I didn’t sleep so well last night… I really must remember to buy my mum a birthday present… What is the meaning of life?…” It goes on and on! This can be particularly useful if you have a lot on your mind that you want to clear.
2. Pick a prompt and answer it
I have a list of journal prompts that specifically encourage deeper and reflective thinking to put me in a strong mindset and help uncover anything that could be holding me back or getting in my way.
Here’s 10 that you can use:
What would make today feel successful?
What am I avoiding and why?
What am I believing about myself that might not be true?
What am I afraid will happen if I fail?
What am I afraid will happen if I succeed?
If I looked back on today in 5 years, what would I be proud of?
What rule am I following that I never agreed to?
What am I making more complicated than it needs to be?
What feels unsafe about moving toward my vision?
What gave me energy recently? What drained it?
The process is simple:
Pick a prompt and journal until either your hand hurts or you feel complete.
Next steps
More steps after the 7 steps? But Natalia, I thought you said it was only 7 steps in this process?
Well, the next step is to go and start your day! Get comfy and get started with your first task!